Monday, February 24, 2014
Kent Coffey find!
I scored this mid century nugget when a friend of mine was browsing through
The Salvation Army. She sent me a pic showing the name on the inside of the
drawer. I couldn't call her back fast enough telling her to "GRAB IT!!"

Who donates a Kent Coffey???!!! Thank you whomever!
Look at the cute little acorn hardware, which polished up quite nicely!! Use a fine steel wool and a good polish.
Look at the cute little acorn hardware, which polished up quite nicely!! Use a fine steel wool and a good polish.

I gave the top a coat of aqua chalk paint with a celery green accent in the quatrefoil pattern.
I also kept the factory black paint by lightly sanding and then giving it a few coats of my
homemade black chalk paint. (I used 'Gliddens' in Onyx).
I also kept the factory black paint by lightly sanding and then giving it a few coats of my
homemade black chalk paint. (I used 'Gliddens' in Onyx).

Ended up making my own stencil. I printed it out on contact paper and used an exacto knife.
Not exactly a 10 on my fun-O-meter, but I managed to finish it!


FLOWER FROGS AND FLORENCE new color and hardware storage
I picked up a tester pot of the new ASCP color called Florence.
It is a vibrant turquoise and I do love it. George has a collection of mason jars he has found at yard
sales, and when he wasnt looking I snuck off with several and painted them in a shade of this new
color. He was so pleased he suggested offering them in the Etsy shop.
 |
| You can give your room a special pop of color with vintage mason jars painted in your favorite color. |

I mixed a small bit of ASCP Florence with Pure White to get this beachy color
and splashed it throughout our summer deck.


This is one of the projects I the ladies work on. They got to fill holes, brush paint, wax, distress,
drill, nail, and finally install new glass knobs.
This weekend we had a very successful workshop on that same deck and everyone asked about the paint color.
This is one of the projects I the ladies work on. They got to fill holes, brush paint, wax, distress,
drill, nail, and finally install new glass knobs.
 |
| Here is another use for vintage glass flower frogs. |
Sharing with:

Sunday, February 23, 2014
A CLASS A DRESSER AND SOME HANDLES union jack dresser
**THE CLASS**
Hear Ye, Hear Ye
Come One Come All
On this day, 5th of June, in the year of our lord 2012,
for the amusement of all doth announce
Ive been asked to teach a union jack class at
The Passionate Home
20506 Fraser Hwy
Langley BC
http://www.thepassionatehome.com/
604 532 5931
Give the store a call to book your spot.

Ill show you how to lay out the pattern of this English Flag so you can apply it to many projects.


During this hands on event
we will be working with a dresser and using the classic red, white, and blue
and with the technics I show you
you can use any color combination on your own projects.
you can use any color combination on your own projects.

**THE DRESSER**
And for those interested in having their own Union Jack Dresser with out the work


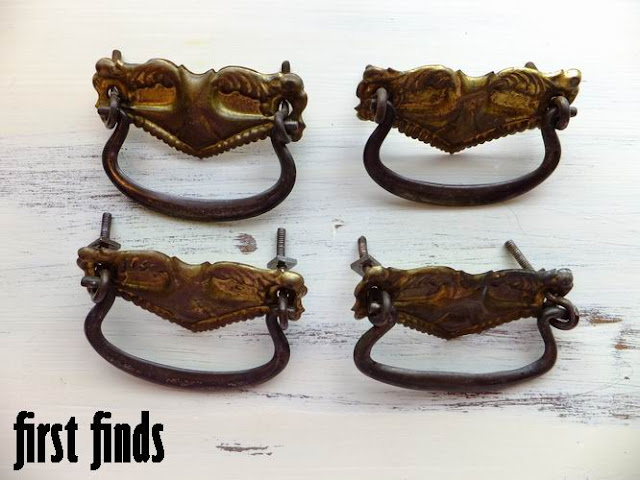
**THE HANDLES**
And last but certainly not least
George has a set of 4 similar antique swing handles like the ones I just used
on the latest Union Jack available in his ETSY shop.
Im a bit of a capenter
If I had to pick one skill to describer myself, I would probably say carpentry.
I have been around carpentry all of my life. My mother started a roof truss manufacturing company when I was born and I have worked there four summers and periodically throughout my life (today actually). Now I work there whenever help is needed.
I have also worked for a construction company for three summers and a little more, this is where I learned most of my house carpentry skills. I learned alot of things from the owner, who is my first cousin. He has taught me alot of valuable skills which will benefit me throughout my life, I have no doubt.
I have dabbled a little with furniture making also. I started designing and building furniture out of antique heart pine by hand about a year ago. I built a few beautiful pieces, but the business never really took off.
My latest carpentry project is a plywood sailing dinghy that I am building. It has been great fun so far and building a boat is a lot different than building a house. I plan on using the dinghy as a tender for my Watkins 29 sailboat that is slipped (docked) in Panama City, Florida.
Read More..
I have been around carpentry all of my life. My mother started a roof truss manufacturing company when I was born and I have worked there four summers and periodically throughout my life (today actually). Now I work there whenever help is needed.
I have also worked for a construction company for three summers and a little more, this is where I learned most of my house carpentry skills. I learned alot of things from the owner, who is my first cousin. He has taught me alot of valuable skills which will benefit me throughout my life, I have no doubt.
I have dabbled a little with furniture making also. I started designing and building furniture out of antique heart pine by hand about a year ago. I built a few beautiful pieces, but the business never really took off.
My latest carpentry project is a plywood sailing dinghy that I am building. It has been great fun so far and building a boat is a lot different than building a house. I plan on using the dinghy as a tender for my Watkins 29 sailboat that is slipped (docked) in Panama City, Florida.
Saturday, February 22, 2014
Spray Finshing Booths for Wood Working
Are used to give a finishing touch to a completed wood working product. Spray booths are used to paint a wood working product. You should have good knowledge about these spray booths before using them for coloring.
These spray finishing booths have replaced the traditional methods of coloring wooden products. Previously roller or a brush was used to paint a finished product. These methods were time consuming. Spray finishing booths has considerably reduced this time. Spray finishing also gives a beautiful look to the end product.
Today spray finishing needs a skilled worker to complete this task. Wood working products such as cabinets, dining set, shelf, and sideboard can all be painted and finished in a spray booth. A wood working product that is painted using spray finishing looks much better than those that are painted by rollers and brushes. In most instances it helps stop any imperfections.
You can effectively paint wood finished products that include toys, bedroom furniture, conference tables, pianos, dining room tables, office furniture Spray finishing booths are not costly and sould be seen as a investment. They give the right finish to your wood working products. If you want high quality finishes to your wood working products then its a must.
Some companies can provide services in coloring wood working products using spray finishing. If requested these companies will provide spray finishing demonstrations, so you can check the quality before going ahead with larger projects.
The spray finishing give smoother and more uniform finish. That is why these spray finishing booths have become increasingly popular. More and more companies have started taking advantage of this revolutionary technology. So are you ready to use this spray technology.
Read More..
These spray finishing booths have replaced the traditional methods of coloring wooden products. Previously roller or a brush was used to paint a finished product. These methods were time consuming. Spray finishing booths has considerably reduced this time. Spray finishing also gives a beautiful look to the end product.
Today spray finishing needs a skilled worker to complete this task. Wood working products such as cabinets, dining set, shelf, and sideboard can all be painted and finished in a spray booth. A wood working product that is painted using spray finishing looks much better than those that are painted by rollers and brushes. In most instances it helps stop any imperfections.
You can effectively paint wood finished products that include toys, bedroom furniture, conference tables, pianos, dining room tables, office furniture Spray finishing booths are not costly and sould be seen as a investment. They give the right finish to your wood working products. If you want high quality finishes to your wood working products then its a must.
Some companies can provide services in coloring wood working products using spray finishing. If requested these companies will provide spray finishing demonstrations, so you can check the quality before going ahead with larger projects.
The spray finishing give smoother and more uniform finish. That is why these spray finishing booths have become increasingly popular. More and more companies have started taking advantage of this revolutionary technology. So are you ready to use this spray technology.
Searching For Custom Cabinets Fort Myers
The good thing about having custom cabinets made is that you know they are going to fit in perfectly due to them being made to measure and also to the exact type that you would like. So for people who live in the Fort Myers area you should really start your search by using the keywords custom cabinets Fort Myers.
You shall then see a number of carpenters or furniture makers who work in this area. Your attention should initially be drawn to those companies that have their own website. If you are looking at a general directory you may have to really search out any company website in order to actually view it.
Their website should contain images of previous work as it is important you know the quality of work you are going to be paying for. You want it to be of a high standard so you really do not want to just hire someone blind without knowing what they are capable of.
If they do not appear to have any images or they have very few then you can also ask the company for references. A well established company of this type should have references from happy customers that you can check as they know this can make you feel much more confident in hiring them for the job. Of course it is much easier for you if you have a friend or a family member who has used them as at least you can see the work for yourself and judge how good you think it really is.
It is also a good idea to look into the background of the company in respect of their qualifications and relevant experience. You should try and pay particular attention to logos of associations which are linked to either furniture making or carpentry. These associations take their membership seriously so people must work to a constant high standard. You can of course check with the associations themselves that the company are actual real members.
You more than likely already know what you are wanting built however it is important they come and visit you at home. They can discuss the job and give you samples of wood with different grains so you can pick out the exact one you want. They can advise you on the best colour in the room and give you some useful tips on the style.
You do have to get more than one company to come and talk to you and get them to leave you estimates. A custom cabinet is going to cost that bit more than normal but it is going to be unique but get several quotes so you can determine if you are being given fair prices or if one company is trying to just over charge you.
Read More..
You shall then see a number of carpenters or furniture makers who work in this area. Your attention should initially be drawn to those companies that have their own website. If you are looking at a general directory you may have to really search out any company website in order to actually view it.
Their website should contain images of previous work as it is important you know the quality of work you are going to be paying for. You want it to be of a high standard so you really do not want to just hire someone blind without knowing what they are capable of.
If they do not appear to have any images or they have very few then you can also ask the company for references. A well established company of this type should have references from happy customers that you can check as they know this can make you feel much more confident in hiring them for the job. Of course it is much easier for you if you have a friend or a family member who has used them as at least you can see the work for yourself and judge how good you think it really is.
It is also a good idea to look into the background of the company in respect of their qualifications and relevant experience. You should try and pay particular attention to logos of associations which are linked to either furniture making or carpentry. These associations take their membership seriously so people must work to a constant high standard. You can of course check with the associations themselves that the company are actual real members.
You more than likely already know what you are wanting built however it is important they come and visit you at home. They can discuss the job and give you samples of wood with different grains so you can pick out the exact one you want. They can advise you on the best colour in the room and give you some useful tips on the style.
You do have to get more than one company to come and talk to you and get them to leave you estimates. A custom cabinet is going to cost that bit more than normal but it is going to be unique but get several quotes so you can determine if you are being given fair prices or if one company is trying to just over charge you.
Friday, February 21, 2014
Small Garden Ideas Pictures
Ideas for garden landscaping - garden plans and layouts
Ideas for garden landscaping

4 Dual Purpose Plants For Small Garden Backyard House Plans
small gardens ideas4 dual

Read More..
Ideas for garden landscaping
4 Dual Purpose Plants For Small Garden Backyard House Plans
small gardens ideas4 dual
American Garden Ideas
Garden Designers Bloglink: 5 Regional Ideas | Miss Rumphius Rules
Garden Designers Bloglink: 5 Regional Ideas | Miss Rumphius Rules

1-country-style-garden-ideas | Home Interior Design, Kitchen and ...
1-country-style-garden-ideas | Home Interior Design, Kitchen and

Read More..
Garden Designers Bloglink: 5 Regional Ideas | Miss Rumphius Rules
1-country-style-garden-ideas | Home Interior Design, Kitchen and ...
1-country-style-garden-ideas | Home Interior Design, Kitchen and
How To Cut Plywood With A Circular Saw

Since this circular saw cutting jig gets placed up against the cut line, it makes it much faster than other cutting guides that require you to offset the guide some distance from the line. The design also helps prevent splintering and tear out of the thin plywood veneer.
What Youll Need
Materials
- 4 x 8 sheet of 1/4" tempered hardboard, melamine or plywood (3/8" or 1/2" will also work)
- Appropriate screws or staples depending on material
- 1 can of Rust Oleum AS2102 Anti-slip Spray Paint
or similar
Tools
- Circular Saw
- Tape Measure
- 4 x 8 sheet of 1" to 2" rigid foam insulation
- Pencil
Step 1

Measure the distance between the edge of the circular saw base and the circular saw blade on the bottom of your circular saw as shown.
Youll be measuring the longer of the two distances. It should be the side opposite where the arbor nut is.
Write down this measurement as youll need it later.
Step 2
Lay the rigid foam insulation on the floor or on a large worktable. The insulation will serve as your cutting surface so you dont have to rig up a bunch of sacrificial boards.
Mark the factory edge of one of the 8 lengths of the hardboard with some arrows and mark a cut line 3" from that edge.
Set the depth of cut on the circular saw to just over 1/4", the thickness of the panel and cut along the line. If you dont have a way of making a perfectly straight cut dont worry, well only be using the factory edge.

Step 3
Take the circular saw fence to blade measurement you obtained in Step 1 and add the width of the previous cut (3") plus another 4-5" and mark a straight line that distance from your last cut on the hardboard panel and cut out that section. Again it doesnt have to be perfectly straight.

Step 4
Align the first piece you cut on top of the second piece. Make sure the factor edge (marked by arrows) is facing the right. On the right side of the board make sure there is at least the width of the fence measurement from Step 1 plus 1". You can use a large t-square like a drywall square to help keep the pieces aligned.
Screw or staple the top guide to the base. You can glue it in place but using screws or staples will allow you to reposition the guide if the edge starts getting torn up. Make sure the tips of the screws or staples dont poke through the bottom piece or it could scratch the wood youre trying to cut in the future.

Step 5
Place your guide over Take your circular saw and place the base tightly up against the factory edge of the top guide and carefully cut off the excess from the bottom of the guide.

You now have a circular saw guide that will allow you to rip a full length sheet of plywood. Your cut line will be where you place the edge of the guide. This makes it easy to make accurate and straight rip cuts in plywood with a circular saw.
Step 6
On the back side of the guide that will be in contact with the plywood youre cutting, spray an anti-slip spray such as Rust Oleum AS2102 Anti-slip Spray Paint to help prevent the cutting guide from sliding around.
Step 7
You can now use your new guide to make a shorter guide for cross cuts. Make it longer than 48" so you can add a guide to the bottom that will help keep position the guide perpendicular to the plywood as sown. Just make sure the length of the board past the bottom guide is at least 48"

Using Your Circular Saw Guide
Using your DIY Circular saw guide is easy. You no longer need to know how far the blade cuts from the face like you do when youre cutting with other straight edges.
Lets assume we want to rip a 12" wide board out of a sheet of plywood. Simply place the plywood on top of the rigid insulation and mark a line 12" from one of the edges of the plywood.

Now place your plywood cutting jig on top of the plywood. The jig should be on the keep side of the line and the edge of the guide should be right on the line as shown. Clamp down the guide at each end to prevent it from slipping. Make sure the clamps wont get in the way of the saw.

Set your circular saw to cut just over the thickness of the plywood youre cutting plus another 1/4" (or the thickness of your guide) and carefully cut using your circular with the base pressed up against the guide.

Preventing Tear Out
Keeping the good side of the plywood face down on the rigid insulation, and keeping the depth of cut just below the plywood will help minimize tear out on the bottom of the plywood.
Since the guide is right up against the cut line, it will help prevent tearout on the "keep" side of the cut. To minimize tearout on the waste side you can first use a utility knife to score along the cut line. Placing blue painters tape along the line also helps.
The most important component to reducing tearout though is a good circular saw blade. The best circular saw blade to use for plywood is the Freud LU79R007 Perma-Shield Coated Ultimate Plywood and Melamine Saw Blade, 5/8-Inch Arbor 7-1/4-Inch . Ive also had good success with the Freud LU79R007 Perma-Shield Coated Ultimate Plywood and Melamine Saw Blade. Both leave a near perfect edge on the plywood even without a guide, scoring or taping.
Thursday, February 20, 2014
Garden Plot Ideas
Garden plot will connect the campus, grow food and people ...
Garden plot will connect the

5 Great Ideas for a Beautiful Vegetable Garden: Organic Gardening
and no garden education.

Read More..
Garden plot will connect the
5 Great Ideas for a Beautiful Vegetable Garden: Organic Gardening
and no garden education.
Tips on How to Remove Drywall Mold Properly
We know about that green spots growing on your old sandwich bread, but did you know that you can also get fungi to grow on your drywall? If you see that black stuff growing on your drywall that looks a bit like that green stuff growing on your old or stale bread then you definitely have a big problem. This basically means that your home is providing great conditions for mold to grow.
Although these things don’t really look harmful, but you have to remember that the black fungus growing on your drywall isn’t only ugly but is also dangerous. All molds can be eliminated immediately and are not as harmful as the black mold. If you suspect that this kind of mold is lurking and growing on your walls anywhere in your home, it is in your best interest to remove it immediately as drywall molds is a very serious matter.
Once you locate where the black mold is growing and thriving, the first step is to protect yourself. The reason for this is that breathing in this stuff can be poisonous to your body. In fact, black mold can cause respiratory problems and it can even be as serious as bleeding of the lungs. It can cause headaches, nausea, dizziness and other serious health problems.
Before you start removing drywall molds, try to invest in a pair of rubber gloves, eye goggles and good pair of respirator mask. These things will prevent you from inhaling black mold.
The next step in getting rid of the black mold or drywall mold is to seal off the contaminated room. You don’t want the spores of the fungus to become airborne while you work, which can spread to other rooms. Use a plastic sheet and duct tape to seal off the room you are working in. Also, you have check the surrounding walls, ceiling and floors as it is not uncommon for fungus to spread in nearby areas.
The bad news is that the moldy wall cannot be saved. The reason for this is that the material cannot be penetrated below the area surface, which means that the fungus below the surface of the material or the drywall cannot be removed. Disinfecting the area will not work. This basically means that you have to cut the infected area with a utility knife. Once you cut off the infected area, the next step is to dispose of it in a sealed trash bag and remove it from your home.
The next step is to clean the surrounding areas using a product that is designed for mold removal. Use only a light touch of the product in order to avoid surface damage. You also have to avoid using bleach as it cannot penetrate below the surface of the material.
After disinfecting the material, the next step is to dry the areas thoroughly. If it’s one thing that you don’t want, it’s allowing the mold to re-grow on wet surfaces.
After you have completely dried the treated material, the next step is to get rid of all traces of the fungus. After that, you can easily patch the surface where you removed a part of the drywall.
You have to keep in mind that if a large area of your drywall is affected by mold, the best choice to get it removed is by hiring a professional and have the entire wall replaced. This may seem like a costly solution but alchoices remember that what’s at stake here is your health.
Read More..
Although these things don’t really look harmful, but you have to remember that the black fungus growing on your drywall isn’t only ugly but is also dangerous. All molds can be eliminated immediately and are not as harmful as the black mold. If you suspect that this kind of mold is lurking and growing on your walls anywhere in your home, it is in your best interest to remove it immediately as drywall molds is a very serious matter.
Once you locate where the black mold is growing and thriving, the first step is to protect yourself. The reason for this is that breathing in this stuff can be poisonous to your body. In fact, black mold can cause respiratory problems and it can even be as serious as bleeding of the lungs. It can cause headaches, nausea, dizziness and other serious health problems.
Before you start removing drywall molds, try to invest in a pair of rubber gloves, eye goggles and good pair of respirator mask. These things will prevent you from inhaling black mold.
The next step in getting rid of the black mold or drywall mold is to seal off the contaminated room. You don’t want the spores of the fungus to become airborne while you work, which can spread to other rooms. Use a plastic sheet and duct tape to seal off the room you are working in. Also, you have check the surrounding walls, ceiling and floors as it is not uncommon for fungus to spread in nearby areas.
The bad news is that the moldy wall cannot be saved. The reason for this is that the material cannot be penetrated below the area surface, which means that the fungus below the surface of the material or the drywall cannot be removed. Disinfecting the area will not work. This basically means that you have to cut the infected area with a utility knife. Once you cut off the infected area, the next step is to dispose of it in a sealed trash bag and remove it from your home.
The next step is to clean the surrounding areas using a product that is designed for mold removal. Use only a light touch of the product in order to avoid surface damage. You also have to avoid using bleach as it cannot penetrate below the surface of the material.
After disinfecting the material, the next step is to dry the areas thoroughly. If it’s one thing that you don’t want, it’s allowing the mold to re-grow on wet surfaces.
After you have completely dried the treated material, the next step is to get rid of all traces of the fungus. After that, you can easily patch the surface where you removed a part of the drywall.
You have to keep in mind that if a large area of your drywall is affected by mold, the best choice to get it removed is by hiring a professional and have the entire wall replaced. This may seem like a costly solution but alchoices remember that what’s at stake here is your health.
Wednesday, February 19, 2014
Some More Finishing
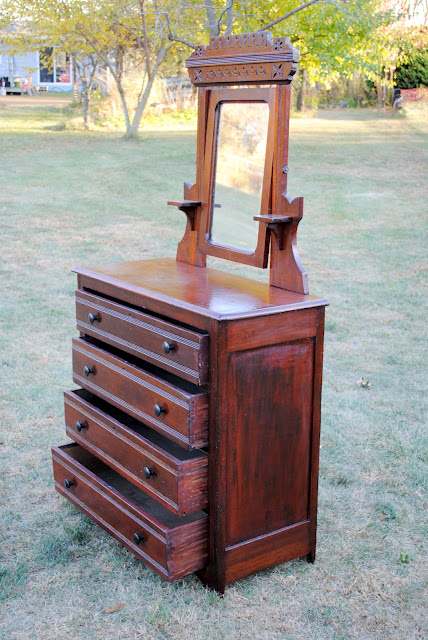
A while back I wrote on here about an antique dresser my wife and I own that was in pretty rough shape. I took the nearly the whole thing apart and put it all back together again. Then the cold weather set in and though I had the stain applied, it got too cold and I didnt get the finish applied.
I lack a lot of room in my shop so the dresser followed me home and it sat in its place in out bedroom waiting for me to have a chance to apply the shellac and wax finish. Well with having to move from our apartment meant I had a chance to move the dresser back to the shop and five a finish to what I started.
If you want to see the train wreck that this dresser started as you can check out all the collected posts by clicking HERE. (Note: The collected posts include this post as well, you will have to scroll down past this one to see into the past of this dresser, thanks.)
Today I was able to call this one done. Thats two projects that have been hanging around taken out in less than a week.


Now if I only could get my attempt at building a tall case clock back from the lady who is supposed to rosemal it.
Ratione et Passionis
Oldwolf
Read More..
I lack a lot of room in my shop so the dresser followed me home and it sat in its place in out bedroom waiting for me to have a chance to apply the shellac and wax finish. Well with having to move from our apartment meant I had a chance to move the dresser back to the shop and five a finish to what I started.
If you want to see the train wreck that this dresser started as you can check out all the collected posts by clicking HERE. (Note: The collected posts include this post as well, you will have to scroll down past this one to see into the past of this dresser, thanks.)
Today I was able to call this one done. Thats two projects that have been hanging around taken out in less than a week.
Now if I only could get my attempt at building a tall case clock back from the lady who is supposed to rosemal it.
Ratione et Passionis
Oldwolf
wood projects plans
 |
| wood projects plans |
One of the most helpful woodworking project plans you can do is constructing wooden storage room organizers. It doesnt matter what the size of your property you never have enough safe-keeping room. You are able to double the beneficial space in the master wardrobe just by producing the space a lot more useful. Forget about digging via piles involving stuff or perhaps searching via boxes to discover what you need. Together with organizers positioned in your cabinets you will make the absolute best use of each and every square inch regarding space that youve available. With some simple resources and a few equipment you can save your tremendous amount of energy, money and also eliminate the muddle at the same time.
A number of the things that youd need for this kind of woodworking project plan would have been a screwdriver; wood fasteners and solid wood shelves. Your current first step end up being to get the proportions, you will need equally height along with width of ones closet coordinator. This will make it simple to build your leader to the right proportions before you set it up. This step could be somewhat hard but it will ensure you your closet program will be very steady.
The next step is usually to build your organizer in the same manner as if this were a typical shelf. Because of this you use vast, thin panels as the component that holds up with the side to side boards traversing it. This will likely produce the shelves. Following attach both the vertical snowboards together. One does this through nailing a piece of sponse board to be able to both of its to form a backed panel. This provides better stableness the minute the unit is actually standing.
 |
| small wood projects plans |
This would then end up being followed by joining together both the vertical assistance panels towards the horizontal racks. By transforming the space of the racks you will be able to possess room pertaining to items that are very different sizes.
Then you definitely place the plastic rod or material that would operate horizontally. You must place this specific towards the top of your current unit. The objective of this is for you to definitely have a location to hang your own jackets, gowns or other garments that you put on hangers. Make sure you check that the actual pole can be securely mounted and ensure the sturdiness. This is extremely important particularly if have any large items.
Last but not least, your woodworking project plans almost full. Try to find an attractive curtain to cover up the coordinator and be sure to hold if through the top side of the unit. This may cause your storage room organizer seem chic. In addition, this will furthermore serve as a approach to separate those items in your leader to the kinds in your wardrobe.
 |
| simple wood projects plans |
Tuesday, February 18, 2014
circus bedroom ideas circus theme bedroom decor decorating circus theme bedrooms
Step right up and enter the Three Ring Circus!
Bring the exciting and vibrant feeling of the Big Top Circus into your bedrooms and playrooms.

Circus BED Canopy
This fun bed canopy creates a room-in-room feeling. Can also be hung alone on the wall and at a lower height to make a cozy spot where your child can sit and play or read. Folds flat against the wall when not in use. Hang over a bed, doorway or window!circus tent ceiling light
circus clown wall decal
at your decal decor shop
Balloon wall decals
Ringling Bros. And Barnum & Bailey Circus Plush Elephants
For lots more circus themed bedroom pictures and circus, carnival, and cupcake candy land theme decorating ideas and decor
click here to visit the circus themed bedrooms
click here to visit the circus themed bedrooms

Accent the circus themed bedroom with fun circus themed decor
circus theme wall decal
Bright Air Balloons wall decal
Bozo The Clown Stand Up

Circus Fun Baby Crib - Circus Fun theme section at ababy
Bozo The Clown Stand Up
Circus Fun Baby Crib - Circus Fun theme section at ababy

Perfect lighting for the circus themed bedroom ....
circus tent ceiling light

Whimsical Circus 5 Arm Chandelier
Circus Fun theme section at ababy
Ring Around the Circus!
Whimsical Circus 5 Arm Chandelier features elephant and clowns parading around, boasting their skills. You and your little ringmaster are sure to love this adorable chandelier. Including red and white circus tent pompom shades, the circus is ready to begin!

Clown Musical Figurines
For lots more circus themed bedroom pictures and circus, carnival, and cupcake candy land theme decorating ideas and decor
visit the circus themed bedroom decorating ideas and decor

Decorate in a fun colorful big tent style for baby, toddlers and big kids.
If they dont mind clowns, that is.

CIRCUS Mobile

Get creative and design your own big tent style bed canopy - cant you hear the circus music already?

Fun big tent style canopy for kids rooms, perfect for those kids who love carnivals.

Paint the big top canopy around the kids bedroom walls and ceilings to complete the look.

Fun and unique decorating ideas for circus carnival themed bedrooms and baby nurseries

Drape the bed with a fun striped bed tent - it gives you privacy AND the feel of a big top tent

Lots of striped themed decor
Decorate the circus themed bedroom with a fun and colorful theme bed - wont everyone be jealous?
Big Top Circus wall mural and Circus Tent wall mural at magic murals

Circus animals lifesize plush toys
Big Top Circus wall mural and Circus Tent wall mural at magic murals
Circus animals lifesize plush toys
- Realistic looking plush
- Cuddly and huggable


Ferris Wheel and Roller Coaster
Add a little extra fun to the carnival inspired bedroom with a roller coaster style bed, but be warned - its a little hard to sleep on. On the plus side, your friends will never have to worry about where to sleep when youre hosting a sleepover!

And to complete the carnival feel, add a ferris wheel


Wall Mural Giant Ferris Wheel - Paul Frank at cool wall art
Circus Fair Ferris Wheel Wall Decal

Give the windows a fun carnival feel

more views of this room here
And what child wouldnt want a beautiful circus themed under the big top wall mural

visit Posh Tots for more details on the Under the Big Top Wall Mural

Circus Tent
A fun prop for any Circus Party!
This Circus Tent makes a perfect entrance for your little ones birthday party. Personalize the front of this colorful printed cardboard Circus Tent with your own wording. Printed on all four sides. 7 feet 6 inches high x 4 feet wide x 2 feet deep. Easy Assembly.
This Circus Tent makes a perfect entrance for your little ones birthday party. Personalize the front of this colorful printed cardboard Circus Tent with your own wording. Printed on all four sides. 7 feet 6 inches high x 4 feet wide x 2 feet deep. Easy Assembly.

This Carnival Banner has great party appeal with its red and white design. Jointed carnival banner measures 60 inches long and is made of cardstock. Each of the letters are 12 inches in length. This fun and colorful Carnival Banner is a fabulous way to announce the entrance to your next carnival or circus themed event.
Fun carnival theme party decorating props at shindigz party props

Carnival of Lights decorating Kit
Let the fun begin!
Carnival of Lights Kit allows you to any room and party into a carnival! Create the fun for all ages with this complete kit!
The Carnival of Lights Kit includes:
- 1 Ferris Wheel Standee
- 1 Carnival Entrance
- 1 Yellow Sequin Luminescent Column
- 1 Red Glitter Luminescent Column
- 1 Carousel Horse
The Ferris Wheel Standee is printed on cardboard measuring 9 1/4 feet high x 8 1/2 feet wide x 1 ft deep and features chasing lights and a rotating motor. The standee also includes our Carnival Midway Sound Chip that makes the sounds of a carnival vendor bringing in the customers.
Carnival Entrance
Each Carnival Entrance Arch measures 9 1/2 feet high x 7 1/4 feet wide and may be personalized to coordinate with your Carnival theme. Carnival Midway Sound Chip is also included.
Yellow Holographic Luminescent Column
Luminescent Columns adorned with sparkling sequins measuring 8 feet high x 2 feet wide.
Red Glitter Luminescent Column
Luminescent Columns adorned with glittering fabric covers measuring 8 feet high x 2 feet wide.
Carousel Horse
This Carousel Horse is printed on cardboard and is free-standing measuring 7 1/2 feet high x 5 feet wide.
Fortune Teller Photo Stand In
The Fortune Teller Stand In is made of cardboard which may be personalized with your wording and allows you to take memorable photos. Each Fortune Teller Cutout measures 7 feet high x 3 feet wide. Sold separately.
Carnival Marquee Banner - A great banner for your carnival!

Fun carnival theme party decorating props at shindigz party props
Big Top Circus wall mural and Circus Tent wall mural at magic murals

For lots more circus themed bedroom pictures and circus, carnival, and cupcake candy land theme decorating ideas and decor
visit the circus themed bedrooms
For lots more circus themed bedroom pictures and circus, carnival, and cupcake candy land theme decorating ideas and decor
visit the circus themed bedrooms
Carousel theme bedroom decorating ideas and carousel horse theme decor
Carousel theme bedroom pictures Blog
Cupcakes bedroom picture blog
Polka dots Theme Bedroom decorating ideas and decor
Stripes Theme Bedroom decorating ideas and decor
The circus was much more than entertainment--it was a major event in the life of the community
Normal activity ceased. Schools and shops closed. Farmers abandoned their fields. Everyone flocked to the grounds outside of town, gawking as sweaty workers erected big tents and handlers fed exotic animals. Performers practiced their acts for the crowd--a very sly way to boost ticket sales.

------------------------------------------------------------------------------------------------------------------------------
 is copyrighted work by Maries Manor Kids Theme Bedrooms
------------------------------------------------------------------------------------------------------------------------------
Subscribe to:
Posts (Atom)
